Penny Battery
Question: What is a penny battery?
 |
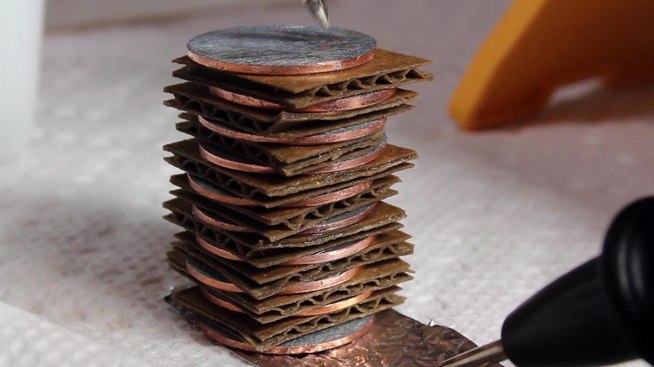
Josh: That is a penny battery which consists of 6/7 different materials potentially giving you enough energy to power a led.
Question: What materials are needed to assemble the penny battery?
Josh: To assemble the penny battery you will need cardboard, vinegar, tinfoil, electrical tape, pennies and a led to test the functionality of the battery.
Question: How is it assembled?
Josh: You first need to cut out a small rectangular piece of tinfoil, then place a penny on top of that piece of tinfoil, and after place a square piece of cardboard about the size of the penny dipped in vinegar on top of that. That is one cell and to create more cells you keep on repeating the steps creating more cells and voltage(power).
Question: Anything more I have to do to the pennies before assembling the penny battery?
Josh: Yes, you have to expose the zinc on one side of the penny by scraping it away with either a sheet of sandpaper or a metal file.
Question: Do the pennies have to be from a certain year?
Josh: The pennies do need to be dated after the year 1982 which contain more than 97% zinc as opposed to the pennies made before that year which were made of almost entirely copper.
Question: Why is it necessary for the pennies to contain zinc rather than copper?
Josh: Zinc provides the power to drive the reaction within the battery providing two electrons to carry charge that contains a good amount of voltage when combined in cells as opposed to copper which isn't.
Question: How much voltage can you get from the penny battery?
Josh: That all depends on how many cells you create within the penny battery but in this picture I demonstrate how you can get enough voltage to power a small led light. Which takes just about 5 cells or 5 volts which is more than enough volts to power and led for sometime.
Question: How do I place my led to check is my penny battery is functional?
Josh: The top of the penny is the positive side and the tinfoil piece is the negative. Make sure both ends of the led are corresponding to that. Then use electrical tape to hold the penny battery together and making sure it's airtight preventing the vinegar from drying out too fast.
Question: How does the vinegar help the penny battery?
Josh: The vinegar in the cardboard pieces are used to help sustain the energy throughout the different cells causing the penny battery last longer.
Question: Are there any alternatives in making the penny battery?
Josh: Yes, instead of scraping off one side of the penny exposing the zinc you can use zinc washers saving you a lot of time. It will then be assembled with the washer first, cardboard dipped in vinegar second and the penny last.
Penny Battery Diagram (Circuit Symbols)
source: https://upload.wikimedia.org/wikipedia/commons/thumb/0/06/Voltaic_pile.svg/2000px-Voltaic_pile.svg.png


